To unlink guest with a new payment method use the unlink button in the appointment summary. Unlinking a guest prior to check out is not recommended but can be done using the edit feature.
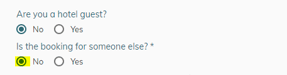
This feature is used when a guest wants to pay for another guest, or if someone else made the appointment for them, but would like them to pay for themselves.
Instructional Videos:
Linking Many Appointments for Same Guest
Linking/Unlinking Registered Guests
Linking/Unlinking a new guest (unregistered)
For Desktop/iPad:
Unlinking Prior to check out
1. This is not usually recommended, as the host email and credit card will still be associated with the unlinked guest. They will not receive their own receipt or any future confirmations.
2. If this must be done, use the edit button to change the name back to the Host. Make note of the guest name and which provider and time they were booked. Select that this booking is not for someone else.
3. You may then unlink the appointment from the appointment summary screen using the unlink button.
![]()
4. Once the appointment unlinks you are able to return to the edit screen and change the name of the guest.
**NOTE: The card will still be associated in Stripe to the Host's email, and the email will not be able to be changed to the new guest.**
Unlinking Registered Guests
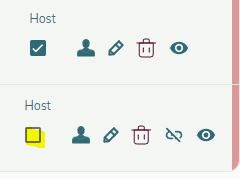
- From the Calendar View choose one of the linked appointments to open the appointment summary at the bottom of the page.
- From the Summary screen select the unlink icon, to separate the appointments.


Linking Registered Guests:
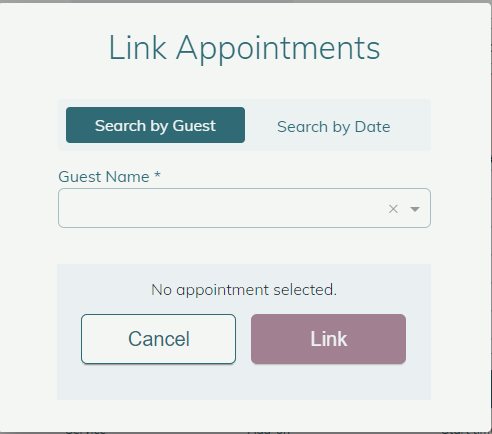
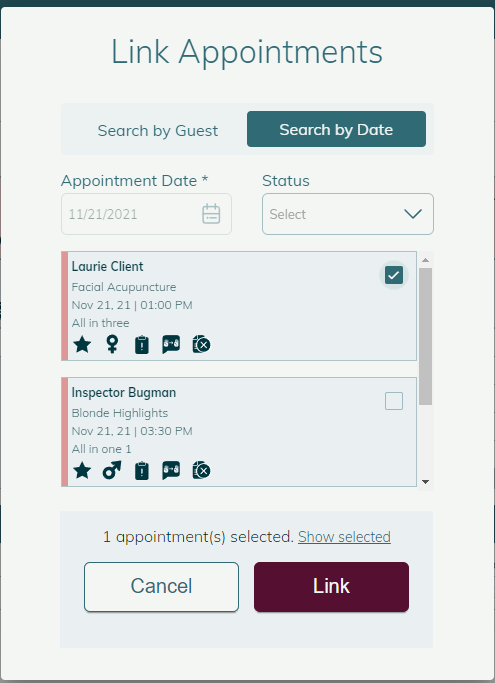
- To link an existing appointment open the host’s (the payer) appointment. In the summary select Link an Existing Appointment.
- Search for the name of the 2nd guest’s appointment, check the box for their appointment and select Link.
- You may also change the host in the summary screen by selecting the host box next to their appointment,
Linking Unregistered Guests
- When adding a guest service to a host’s account, use the +Add More Service option from the Appointment Summary view.
- The hosts information will pre-fill on the side scheduler window. Answer Yes to: Is this booking for someone else?
- NOTE: This guest will be registered under the Host’s credit card. If this guest wants to pay another way, you will be prompted to register the guest when you unlink them from the host.


Unlinking Unregistered Guests to pay for themselves
- To unlink an unregistered guest, so they can pay separately from the host, select the unlink option in the appointment summary window.
- This will prompt you to register the guest.
- Next enter the new credit card details.
- The appointments are now booked separately under their own credit cards

